Tuesday, November 29, 2011

12 tags of 2011 - Tags 5 to 8


As promised, here are the details of tags 5 to 8...


Tag 5
A paper doily was sprayed with brown Glimmer Mist and adhered to the center of the tag.
"Merci" was rubber-stamped with a stamp from Cavallini over part of the doily and the lower part of the tag.
A glass test-tube was filled with paper flowers and a headpin with a bead through it added to the top of the cork before closing it.
A torn strip of fabric and some rusted wire mesh were wrapped around the tube and
a picture from Darkroom Door and a sticker by Cavallini adhered to the tag behind the tube.
The resin keyhole (bottom right) is from Melissa Frances

Go to our posts of 
  for more ideas of how you can use test-tubes as part of a larger mixed media work of art.


Tag 6
The tissue paper flower was made using the instructions as per
Elna's entry of August 27th, 2011.
An Adage Ticket from Tim Holtz and
tailors' tape ribbon from Ebony and Ivory complete the tag.


Tag 7
A Stampers Anonymous image of a shrine was stamped onto some music paper and a window cut out to expose clipart by Crafty Individuals.
Rouged rayon ribbon at the top of the tag completed the look.


Tag 8
The background was stamped with a stamp from Stampers Anonymous.
The top of a mini bingo card by Jenni Bowlin was trimmed off before adhering the larger part to the center of the tag.
A birdcage by Marianne Design die-cut was distressed with blue Glimmer Mist and positioned over the shortened bingo card.
The smallest rosette by Tim Holtz with a flat-back pearl completed the tag.

Eight down, four to go...

Thank you once again for visiting!

Sunday, November 27, 2011

12 Tags of 2011 - Tags 1 to 4

 A couple of weeks ago, one of my friends asked me to design a project featuring tags for her and some of her BFFs.  I remembered saving a similar project by the hugely talented 2GypsyGirls (Paula & Deb) under my favourites at the end of 2010 and went hunting for it.  Their project served as inspiration for what I decided to put together for Mercia and her friends...

I opted to use only 12 tags which were mounted onto a stretched canvas (covered with tissue paper and colour-washed with cream acrylic paint), measuring 12" x 18".

The tags measure approx. 2.5" x 4.75" (6cm x 12cm) each.

So here is my take on 12 tags of 2010 2011...


Tag 1
The tag was sprayed with Glimmer Mist and
a strip of Tim Holtz tissue tape adhered to the bottom
with a bit of ribbon trim on top.
I glued an image by ARTchix Studio to a silver bezel
and embellished it with some bling,
before filling it with dimensional fluid
and then framing it with black paper lace.


Tag 2
The background was stamped with an image by Crafty Individuals.
A printed tag by 7Gypsies (cut like a flag and prettied up with bling from Prima)
was adhered over the stamped image
and a key-charm attached with pure silk ribbon.


Tag 3
Strips of decorative tape by Prima Marketing were stuck to the top and bottom of the tag,
with a torso image bought from Shabby Cottage Studio as the focal point.
An acrylic pendant was rubber-stamped with an image by Cavallini and painted from the back.
I punched 2 holes on either side of the neck and thread the pendant through black organza ribbon to create a "necklace".


Tag 4
An image by Hero Arts was stamped onto the tag.
The butterfly was die-cut from metal tape (bought at our local hardware store) and embossed with my Cuttlebug machine.  The butterfly was covered with cream acrylic paint, before using a wet-wipe to remove some of the paint, in order to create a distressed look.
A few links from a rosary chain and some rayon ribbon complete the tag.

Details on tags 5 to 12 will follow soon...

Please remember to visit the 2GypsyGirls blog if you want to find more "Tag Inspiration"!

Till next time

Benice

Friday, November 25, 2011

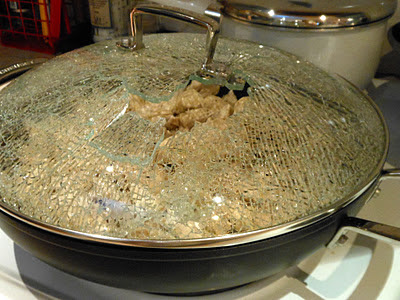
A Little Disaster

When you invite friends for a meal, you plan... everything, at least I do.
Well, when it is six o'clock and they will be arriving at half past six you don't want this to happen!!!


I used this casserole dish for the first time and decided to make Chicken a la King. I fried the chicken strips in olive oil and later covered the casserole to let the chicken simmer for a while, when I got back in the kitchen after few minutes, this was waiting for me.


To cut a long story short, I had to defrost some sausages and I drank a lot of wine that night.....
The lid was replaced but I haven't used it yet. (I am a bit scared)

Four Days Later..... I baked a Cheese cake. The cake was in the oven for five minutes when the cheese mixture started dripping through the pan and onto the bottom of the oven. The drippings turned black and started smoking. I popped in a baking tray to catch the rest of the drippings. After I realized that I did not fit the bottom of the pan correctly, I started crying.

So if anyone wants the recipe for "smoked baked cheese cake" I've got it!

Thursday, November 10, 2011

Making a Glüber flower.

 Cosmo Cricket's new "device"
A glue circle, ready to use on your paper craft projects.


This is a very use full tool.
A little glue circle to make your life easier!

Here are the steps.

1. Punch a circle as big as your Glüber.

2. Remove the backing of the Glüber and adhere it to the paper circle.

3. Cut a piece of ribbon about 40 cm, make a knot at one end and
attach it to the centre of the Glüber.

4&5&6. Start twisting the ribbon away from you and press in a
spiral onto the Glüber as you go along.

7. Once you reach the end of the circle, take the tail of the
ribbon to the back of the circle and adhere.

8. Trim the excess ribbon and embellish with some flat back pearls.


I used the Glübers to make flowers for this Cosmo Cricket project that is
featured in the November/December Craftwise Magazine.


Saturday, November 5, 2011

Birhday Calendar & Notepad Christmas gifts

Yes its time to start making those Christmas gifts! AND I am talking to myself!
Never mind all the birthday gifts!! In November there are at least 6 birthdays coming up.
I will have to start creating.... fast!!
This is the birthday calendar, very easy to make.
The only trick is to make a double scoring line at the back of the little booklet,
3mm or 1/8" apart, so that the booklet can hold a few pages.

In Centurion is a craft shop called Her-Annies. They sell these printed pages,
so that you can create your own calendars. I used craft paper for the whole project,
the inside as well as the cover pages.
A piece of Core'd nations paper was used to create the inside of the front cover.
Emboss, distress, sand and alter with Distress Stains from Ranger.

You can put a craft envelope at the back inside page, for extra notes or stuff.
Stamp with 7Gypsies stamps and add a piece of gaffer tape .

To put the book together, make 3 holes and sew the signature
to the cover. Start in the middle inside, go down and into the inside again.
Then go right to the top and out again.
Finish off by going into the same hole where you started.


Tie a double knot to fasten the thread. Don't cut the ends too short.


The note pad was also covered with the 7Gypsies paper
and embellished with a shipping tag as well as a piece of coloured bias binding.
Stick some Gaffer tape to the top and bottom parts, so the note pad will be able to
handle the wear and tear.


From the leftover 7Gypsies papers on the table, I created some cards.
Always enjoy the creative process!!