Wednesday, October 26, 2011

The old (rusk) baking pan.


I was looking for something to display a few rings, so ..... I went searching in my cupboards and


found this beautiful well used rusk baking pan that belonged to my mother in law.
She used to spoil us with buckets full of rusks when we went to visit her. At one stage -
those were the only rusks my hubby wanted to eat!


Just look at the detail, I think that it was handmade...
maybe not, but I know it is very old.
 My mom and dad are also thinking of moving again, so she is throwing out a lot of things.
I know she has some treasures, things like these that I would love to have.


OK... so, I cut five layers of black foam to fit into the tin and glued them together.
(like sandwiches)
For the top layer I made two slits wright through the foam, lengthwise for the
rings to fit into and then glued the top layer to the rest of the foam.


On the outside, I put down some double sided tape. On top of that, two ribbons and then I tied a sugar spoon to the tin and there you have a display box for the rings!
Don't disregard the old things that comes your way, re-use and recycle them.
Keep well.


Sunday, October 23, 2011

8 Quick Christmas Cards 2011

One of the items we would like to have for sale at our "Pre-Christmas Inspiration Event" on October 29th, is a kit that once completed, will leave you with 8 handmade Christmas cards to give to teachers, friends, family or even your favourite hair-dresser!?

Here are the collages of the three kits you will be able to purchase on the day...

Kit 1 - using papers from Basic Grey


Kit 2 - using papers from Daisy D


Kit 3 using papers from My Mind's Eye.


Each card measures 4" x 4" and all the embellishments have been pre-cut.
The sentiments are printed in English and Afrikaans to make it fully bilingual!?

If you live in South Africa and are interested to purchase a kit, send me an email and I'll provide more info...

Thank you for visiting and may you have a very creative week.


Tuesday, October 11, 2011

A project with my friend.

 After our trip to France I went to Switzerland to visit my friend Alida,
who is a -Boertjie- that has been living over there for about 30 years. 
Feeling very creative I showed her how to decoupage a small chair in a very easy way.
(Remember the coat hanger? This is done in the same way.)


Look at the absolute stunning view from our "studio"! 


First we sanded the chair to get rid of the varnish and to create a tooth for the gel. We aged the dictionary paper with strong tea, let it dry and then teared it into strips that would fit onto the chair.
 Sometimes it is easier to use your fingers to get the gel into the corners and odd places, before sticking down the paper. Remember to use your decoupage roller to get rid of the air bubbles. To protect and seal the chair, finish off with a layer of gel medium.


There is another chair up in the attic,
I wonder if she had time to finish it? 


Joseph a friend of theirs, invited me to play the Alphorn.
So one afternoon we walked over to his house near the woods. 
I tried.. and managed to produce a sound, but not a very good one!


He normally practice at about six in the evening.
Most evenings we could hear the sound coming
from the forest .... and it was magical.


This picture was taken in his garden.


 ..... and this one on the way back home, to Alida.

Saturday, October 8, 2011

What IS a girl to do?


I'm sure many of you have had days when you "needed" to create, but had no access to your creative muse...

On days like that, I find it very fulfilling to pull out a kit designed by a fellow creative soul.  Something where  someone else did all the thinking for me.  No need to try and match colours, papers, embellishments, rubber-stamps, ink, etc.

During a recent visit to Perth, Western Australia, I made a point of visiting Scraptivate, one of my favourite Scrapbooking stores in town.  The ladies from their design team do some amazing work and I am always in awe of the projects they have for sale or teach in their classroom.  The way I see it, their designs are more mixed-media than scrapbooking!?

So, a few weeks ago, I pulled out one of the kits I've bought from them and spent the whole day in my studio creating this gorgeous 3-fold screen. Each screen measures about 3.75" x 8'.

For more detailed pictures, please visit Natalie's blog or go to Scraptivate's blog for more creative inspiration and just maybe you will find one of their kits for sale!?

May you have a weekend filled with creativity and why not pull out one of the (many) kits you've saved for a rainy day and get your creative mo-jo back...

Thank you for visiting!

Monday, October 3, 2011

World Card-making Day 2011

 On Saturday Elna & I hosted a class to celebrate World Card-making Day.

We used only one sheet of patterned paper from Pink Paislee to decorate

a notepad,

 a birthday calender (inside & outside)

and the envelopes of four note-cards.


The note-cards were embossed and decorated to compliment the pictures on the envelopes.
All this from only one sheet of patterned paper - and there are even one or two images left over!?

May you have a creative and colourful week...

Friday, September 23, 2011

Pink Altered File Folder

Elna has mentioned previously that September is "Altered File Folder" month here on our blog.


 I've decided to take the stationery folder from her entry of August 23 and give it a pastel treatment.


The paper used on the cover is from Bo Bunny (a very old range) and the stamped title from a set by Wendy Vecchi at Stampers Anonymous.


This is what the folder looks like on the inside.


The three greeting cards were made with white card-stock, left-over scraps, a flower, some ribbon, a paper doily and printed sayings.


Two ready-made mini cards were decorated in the same fashion.


Cut a few tags from green card-stock, decorate with strips of paper and thread ribbon through the holes.


Now all you have to do is place the greeting cards, mini cards, two white paper bags, the green tags and a couple of small white tags into the folder.


The most difficult part - deciding who you want to give it to
or if you will keep it for yourself...

Elna give detailed instructions for a similar project  in the latest issue of the Craftwise magazine - go check it out.

If you enjoy everything pink, pop on over to Beverly's blog
How Sweet the Sound - this post is number 127 for this week's posts.

Thank you for visiting!

Thursday, September 15, 2011

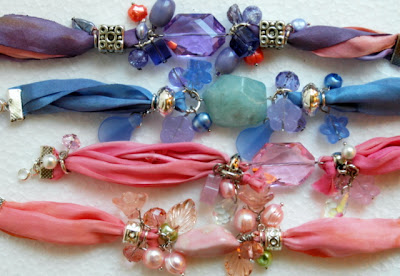
Into Bracelets

Two weeks ago we heard that we could join a private jewellery exhibition/market....
WOW, did we have to spark!!
Designing new bracelets, dyeing the silk, selecting the colours... etc.. etc
One day left and we are nearly ready.


Here are a few of the designs in four colours.
We hope that it will be a hit, but one thing I can say.. verrry objectivly...

THESE ARE GORGEOUS!


Dig out the beads and get creative. Use the space you have and enjoy it.
Benice and I both went through a difficult time the last two weeks and
I think the bracelects saved us both from mini insanity, both our studio's are in beading chaos,
but at least we are surviving and you can always clean up the mess afterwards.

Wednesday, September 7, 2011

Card Making Class


21 September at Succulent Woodlands.
09:00- 12:00

These cards are made with the Parisian Anthology range of papers from Pink Paislee.
We will be making 3 cards with this shabby chic look.

The dressmaker's dummy die and stamp is from the Die-namics Sew Nifty and Stamp Set from My favourite Things.
 Hope to see you there!