Thursday, December 29, 2011

A Dutch Baby breakfast for the New Year

My Friend Diana whom I met in France, asked me if I've ever eaten a Dutch Baby??!
It was something that did not exist in my life. 
She gave me the recipe, but I knew there was no skillet in my closet to bake it in...
 For my birthday, I got the skillet and on Tuesday I made my first Dutch Baby!


 At one stage during the baking process, I thought the thing will completely exit the skillet.
It rises enormously. Then when you take it out, it sags down to this.
Now you can fill it with fried bacon pieces, mushrooms and grated cheese.
I am planning this for New Year's morning breakfast.....
It's delicious.

Saturday, December 24, 2011

Happy Holidays - All the way from the USA to South Africa


Oh, how I love the wonderful world of blogging!!

I recently received a note from my local Post Office to collect a parcel that was too large to fit into my postbox.
This is the parcel that was waiting for me, coming all the way from the USA.

The reason behind it:

A while ago, I posted a comment on the blog of one of our regular guests, 
and she decided to "send me some love" from the States.

Click here to see what her post was all about...


Above are the goodies that were packed inside -
2 tins of Trader Joe's Dark Chocolate Nibs,
a tin of Trader Joe's Espresso Pillows,
a tin of their Green Tea Mints and 
a beautiful glass paper weight.
How cool is that??

Guess where I will be shopping next time I visit the USA??

Thank you Andrea - you've made my holidays even more special.

Thursday, December 22, 2011

Chrismas Garland.

This wooden utensil garland was inspired by a picture in
the TUIS magazine's booklet from a month ago.
Almost everything I used on this garland was bought at a
local craft store, Herannies in Centurion.


 You will need: Berries and roses, glitter, gold leaf and paint.
Ribbon, raffia and glue. Two wooden circles and of course
10 large wooden spoons, 10 forks and 20 small wooden spoons.
Two wooden stars.


 The extra wooden circle is to lift everything off the table, so you can
work better and the handles can stick better to the circle.


I used Dala construction glue to stick down the wooden utensils.
Arrange the large spoons and the forks on the circle 
before you start gluing them down, one by one.

 
For the second layer, I used the smaller spoons and the inner circle is bigger than the first one.
Use enough glue, because it is only a small part that really sticks to the circle.


To hang the garland I took some ribbon and put it through
the circle before sticking down anything else.
Tie some raffia around the roses and berries.


Cover the entire angel with Zig two way glue,
let it dry and lay the angel down on the gold leaf.
Tear off the extra pieces and brush with a stencil brush.


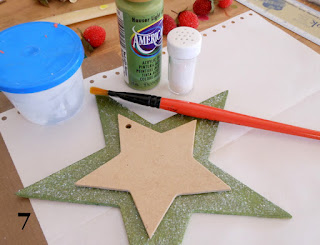
Paint the large star with green craft paint. Let it dry.
Then paint with a layer of gel medium and sprinkle with clear glitter.
Glue the two stars together.
You can use a glue gun or construction glue for the berries and the roses.


 There you go.... almost done, just add the little angel.
  
Happy Christmas everyone!
Thank you for all the lovely comments and
support through the year, love you all!


Monday, December 19, 2011

(Glass)... Painting the midnight sky.


I can't remember when I made this, it was a few years ago. 
I only remember that it was quite a lot of work.


Take a square vase and position a picture on the inside of the vase.
I used Pres-stick to secure the picture to the glass. Put the vase on it's side and
use the gold out liner to draw your picture on the glass.
Wait for each side to dry completely. (at least 24 hours) Do all four sides.


Colour your pictures the way you like, using your glass paint.
First do all the little houses, and let it dry completely. When you do the sky
you can tilt the vase while the paint is still wet so that the colours can mix and blend.
Remove the bubbles with a tooth pick.


Although I don't do glass painting any more, this is still one of my favourites.
During Christmas time I like lighting a candle inside this little village.

Candles are magic....  colours are magic.....


Saturday, December 17, 2011

Making Whoopie Pies and Macarons


I had a "play date" with one of my baking friends today and we decided to give Whoopie Pies and Macarons a try.


 For the Macarons we've used a recipe from Sarie Kos
(one of South Africa's leading food magazines).
We divided the mixture into 3 to create 
Passion Fruit (Yellow)
Raspberry (Pink) and
Grape (Purple) Macarons.
I think they are still a little "rough around the edges", but at least they have "feet"!?

Whoopie Pies have fascinated me for a while and I even bought a recipe book, devoted solely to the wonders of the Whoopie, a while ago.

We've opted for the "original Whoopie" with a marshmallow frosting and I think they look almost too good to eat!?
These measure about 2" in diameter and once assembled,
they were rolled into 100's & 1000's (sprinkles) to pretty them up.

Not bad for a Saturday afternoon, even if I have to say so myself...

Thank you for visiting and hope you have an opportunity soon to give your inner baking diva a chance to shine.

Wednesday, December 14, 2011

Another quick gift idea


In my post of December 4th, I promised you another quick gift idea.  Well here goes...


Cut black mounting board to measure 6.25" x 9.5" and adhere a strip of fancy ribbon to the lower part.
Use acrylic paint and a foam stamp to add detail to the top corners and stamp something appropriate onto a white tag.


 Grab a couple of printed and blank paper-pads, available from most craft & stationery stores (*notepads, 2012 calenders and Birthday calenders could work well).
Bundle together, using a metal paper-clip, to the black mounting board.


Wrap raffia around the pads and finish off with the stamped tag and
a couple of paper-roses.
I also punched a hole in the upper right-hand corner from where a pen, attached to baker's twine, is hanging.

This project can be altered to suit many occasions and colour combinations!?

I hope that this project will assist in making your festive season
hassle-free, cost-effective and above all a creative time.

Thank you for visiting!

Sunday, December 11, 2011

We've been published - The Bead Book Issue 33


 We are so pleased to share the news with you...
Two of our creations are featured in the latest issue of the BeadBook!

The first is Benice's chandelier that was made with a wire cupcake-stand turned upside down.
 
 The second article features a soldered pendant that I made when Michelle from the BeadBook visited us recently.
For detailed instructions on both projects, you will have to buy the magazine from one of your local (South African) bead stores, Spar, CNA or Exclusive Books.

Alternatively you can join us for
an Introduction to Soldering class on 14 January 2012
at my studio in Moreletapark.
See sidebar on the right for more details.

We are looking forward to seeing you in the new year.

Friday, December 9, 2011

In the studio

Working with paper is very rewarding. There are so many things
you can make and so many avenues you can venture into.
We have been busy making tiny resin collages. Putting all kinds of things together.
Creating a story in a tiny bezel is fascinating.
 
This is the view of Benice's studio table at the moment.
Total and utter chaos, but a wonderful source of anything that you might need.

 This is one of the pieces that is ready to be sold.

Tuesday, December 6, 2011

Playing with Photoshop

My kitchen floor and the sky lights in my kitchen was my studio today. Then it became a little overcast and my chance to take a photo was gone. The sun came back and the light was falling at the right angle, so I took my chance. To line up the three canvasses and get the lighting right was a bit tricky. After a few shots I was satisfied and then the major editing process started.
So now we've got a new look.(See our new banner.)


Then I decided to take the editing proses a bit further and this is what I came up with.
Does it look weird? I quite like the look. You can even see the Tattered Angels spray a bit better!
(click on the photo to see the details a bit better)

Anyway, today was a good day. A little calf found a good home.
Hubby dearest had to sell a calf who lost her mother.
A boy at the auction placed the highest bid and bought the calf.
Just thinking of the six week old calf that found a home and someone eager to look after her.... made my day.

Sunday, December 4, 2011

2 Quick Gift Ideas


 In my post of October 30th, 2011 I promised to share the projects that the ladies (and gent) made in my class.


For this project I used a Spellbinder border die to "pretty up" the opening of a brown paper bag before adhering a scalloped circle cut from patterned paper and a paper doily to the front and part of the back.
A match box was partially covered with patterned paper and an appropriate quote stuck on top.
*Remember to leave one side of the matchbox uncovered so that you can still light the matches!
Wrap a ribbon around, place 3 candles inside the bag and place in your Gift Drawer for when you need a small gift in a hurry...


The second project comprises of 4 note-cards and matching envelopes wrapped up in silicon paper.
Silicon paper is a (slightly transparent) crisp white paper used for baking and much stronger than tissue paper.


I printed a quote onto each of the 4 note-cards (4" x 6") and


decorated 4 matching envelopes with rubber-stamps from Cavallini & Co, Pink Paislee and Unity Stamps.


For that something extra, stamp a Tim Holtz quote and a butterfly onto a small white paper bag and place some baker's twine and 4 white gift tags inside.


Place the items together and wrap with the silicon paper before finishing it off with more baker's twine and a paper rose.

One more item to keep for those emergency / last minute gifts needed for a sick friend, a hostess, a favourite teacher or someone in need of some TLC.

Another project will follow soon...

Thank you for visiting!

Friday, December 2, 2011

12 Tags of 2011 - Tags 9 to 12


Here is the final installment of the project...


Tag 9
I printed a digital image bought from House of 3 on the background
and placed a cameo in the oval frame.
Some brown Glimmer mist sprayed onto the cameo face gave it a more authentic "vintage" feel.
The medium rosette by Tim Holtz is finished off with a ribbon flower.


 Tag 10
The image at the bottom of the tag is a free printable from the lovely people at the Silverbox Creative Studio - just click on the image on their post and it will download some great stuff to use in your projects.
Strips of black flower tape were adhered to the top half of the tag and a heart die-cut covered with brown glitter.
A piece of ribbon tied the heart to the tag and "I love thee" punched out and placed over it.


Tag 11
The wings really posed a problem!
In the end I decided to use a die-set from Sizzix and trim the wings to fit my tag.
Strips of Sketchbook Tissue Tape by Tim Holtz added visual interest to the top and bottom of the tag.
For the "crown" I folded a square filigree element in half and decorated the top with light-blue bling.
A watch-face and bell completed the design.


Tag12
An image from Shabby Cottage Studio was glued to the back of a microscope slide and then adhered onto a "Top Ten List" ticket from 7Gypsies.
Rub a postal element very gently onto the microscope slide and rubber-stamp a decorative border to the upper right-hand corner of the ticket.

Well there you have it!  My take on the 12 tags of 2011.

I hope you've been inspired to go and make your own art!?

Please visit the 2GypsyGirls blog for more tag inspiration.