Showing posts with label Tutorials. Show all posts

Thursday, August 22, 2013

The cutest little boxes!

A while ago we had an assignment to make something French.
The boxes we received were the cutest little things with huge potential.
All the boxes and the whole step by step tutorial has been published in the
Bead Book. Issue 43.
The Bead book will become CREATIVE HOBBIES in the future.
 
 Butterfly
 
Fleurs
 
Book of Thoughts
 
 Button up my heart

 Bobbins and lace

Petit Perfumes

Butterfly
 
Lizette also made two boxes.
I will see is I can upload her photos. They are also super cute!
 

Monday, August 19, 2013

Cards for men

Here are six cards designed for men.
To create these cards I had to make a little bit of a mind change,
a colour, theme and embellishment change.
I hope you like them....
 
This card is 5" x 6".
Colour the Tim Holtz Tissue paper with the Distress stains of your choice.
Remember you can always add colour, but you can't take it away.
Die the twill tape with Adirondack Colour Wash.
Use the ink blending tool to colour the background of the stamped image
with Distress inks. The gear element is embossed with one layer of
pewter embossing powder.
 

Stamp the image with Archival black ink. Colour the scarf and the hat
with Distress markers and blend with a water pen.
Use a Spellbinders die to get the torn note book effect of the rust colour paper.
Emboss the sentiment with a double layer of charcoal embossing powder.
The gear embellishment only has one layer of pewter embossing powder.

This easel card is easy if you measure carefully.
Start with a 12"x 6" brown card stock.
Score and fold in half. Now your card is 6"x 6".
 Then score the front page at 3 inches and fold back.
The rust pattern paper with the stamps and the rust pattern paper with the
Eiffel towers need to be the same width.
The green card stock for matting and the rust card stock
for matting also needs to match as well.
Mount the piece of paper with the stamps on foam squares
so that when you open the card it will stand on its own.
 
I hope the instructions are clear. It is sometimes not that easy to explain
things in another language.
I also have a little trouble loading the photos of one of the cards,
but as always.... will try again and
hopefully will publish it soon.
 

This card is also 6" x 6".
Start by placing the four picture squares onto the brown pattern paper.
Measure and cut. Then mat the brown pattern paper onto the red pattern paper.
Get the measurements for the cream card stock.
Put the four pictures on foam squares to get dimension on the card.
Stick the two embellishments to the bottom left picture.
 
For the younger guys, something more funky.
Not as busy as the previous ones, but still interesting.
I used stamps from my 7Gypsies collections.
 
This was the photo that did not want to load onto the blog.
At last!!
The dies I used for the green and white card stock, are from Sizzex.
The stamp pad is from Ranger. Archival Coffee.
Today I am getting some Tim Holtz stamps that I ordered.
I am excited, it is stamps I can use to create more cards for the men.
Keep Well!


Sunday, April 21, 2013

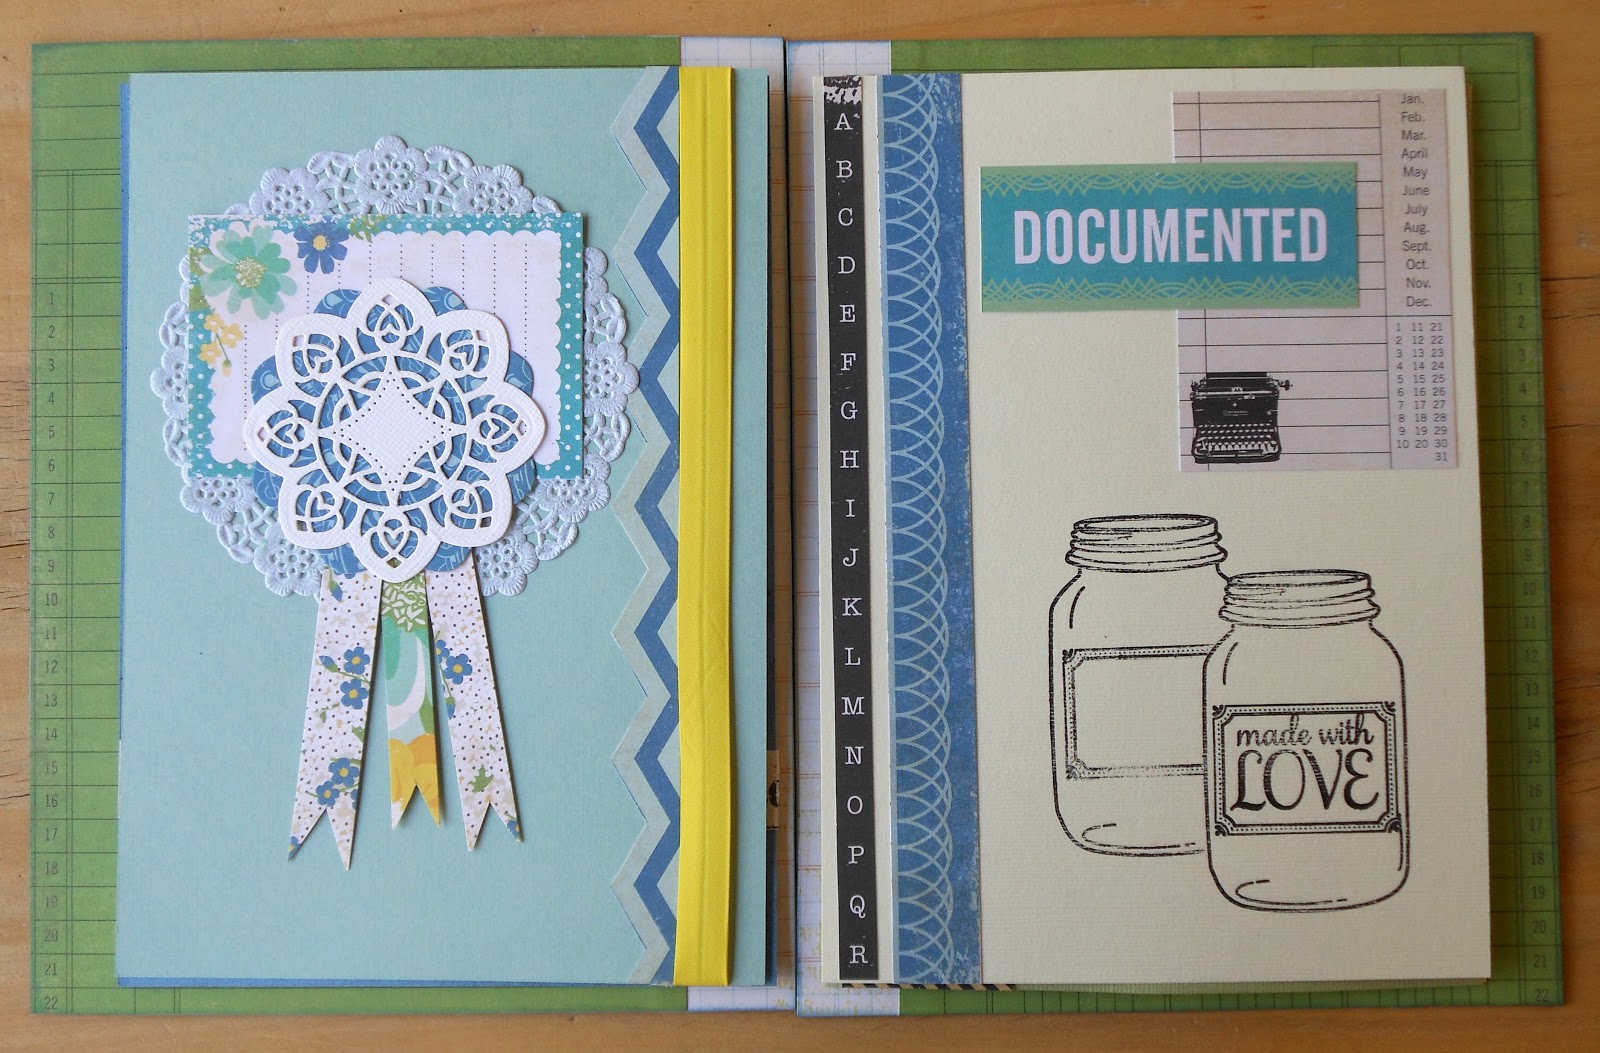
Recipe Book with Mason Jar and Shadow Stamping

Hi there everyone,
welcome to our blog and to this post. Today I am sharing with you, my Recipe book.
The book was inspired by my clients who wanted to make a recipe
book and by this beautiful colourful paper by Echo Park Paper,
and of course by the mason jar picture on one of the papers!
 
 I painted the chipboard letters with Distress paint from Ranger
and then changed the colour with the Distress Stains.
(also from Ranger)
 
This shows you how I placed the double sided tape to stick down the
inside of the front cover. You can use your favourite glue of choice.
 
On the left hand side, which is the inside of the front cover,
 you can write down the index of your Recipe Book.
 
I used a Mask from Prima and sprayed the blue card stock with
glimmer mist.
 
The rosette was cut with a Spell Binders Die. The front part cut from
white Bazzill card stock and the back side form the Echo Park paper.
The doily was sprayed with glimmer mist.
 
The Mason Jar stamp is from Hero Arts.
To do shadow stamping is quite easy.
Stamp the mason jar on the piece of Vanilla Card stock.
Stamp another image onto a piece of thin paper and cut
out the image with your scissors.
Place the image onto the first stamped image and stamp next to it,
but it must overlap.
So... if you look at my picture, you first stamp the image
on the right hand side and then the image on the left hand side. 
 
The fork is a printed piece of cotton ribbon. Some papers were left 12" long,
and just folded in half and wrapped around the edge of the page and glued.
 
The green card stock was sprayed with glimmer mist and I used
another mask from Prima.The small flowers were punched with
a McGill punch.
 
The back of the yellow card stock was also sprayed with
glimmer mist.
 
Punch 5 tabs out of the remaining pieces of card stock and stamp numbers
onto them. Put double sided tape onto the tabs and stick to the
outside of the plastic A6 page protectors.
 
Start by placing number 5 and 1 in the correct positions.
Space the rest of the numbers and remove the backing of the tape to stick them down.
Put all 5 pages into your page protectors. 


For the envelope: Cut off a piece of the top back side.
Fold the remaining front flap over to the front. Fold open again and
use a die cut to create the border. Stamp the two images and use
washi tape and bias binding at the bottom.
 
Bind the book together with three metal rings
and you are done!


Sunday, March 17, 2013

Buttons and Needles Sewing Card Kits

Hi everyone,
For these cards I also took out the seam binding, the buttons, the pattern paper, the doilies the stamps and the inks. Oh, and the measuring tape.
 
If you have a kit like this, start by cutting and folding all you card stock for you cards.
 Put the six blank cards in front of you.

Cut out the different elements for each card.
Put all the elements on each card, even the buttons and ribbon and flowers.
When you have this sorted the rest will be easy and not so confusing.

Now you need to put double sided tape at the back of every element.
A piece of tape close to the edge of each side. Then a small piece in the centre of each piece of paper. This piece will be the first one you remove, just to position the element on your card.
 
Here you can see that I am still busy removing the double sided tape.
First the small piece and then when you've got the positioning correct,
 you can start removing the rest.
You can distress the sides of the paper with a paper distresser,
 just for a bit of texture.
 
Remember always to analyse your picture to see at what stage do you need to tie the ribbon.
 
The element next to the blue bias binding was painted with glimmer spray.
All the paper lace on these cards were glued to the card with Mono Multi glue.
Only use small drops of glue. Let it dry and then place the elements on the card.
 
The yellow bias binding bow was glued down with Mono Multi glue. (dry)
To glue the doilies to the cards I used my Zig blue pen. (dry)
 
To make the flowers.
Make sure you have different sizes of flowers.

Spray or colour them,
 

and use an embossing tool to create a 3D effect
on the flower after it has dried properly.


For all the chipboard elements I used Mono Multi glue. (dry)
If you look closely, you will see that I cut out a thimble from another picture and raised both the words and the thimble by using foam glue squares.
 
For the piece of measuring tape, I used double sided tape. 
 
Use some embroidery thread and tie a knot at the top of each button.
Use foam squares to glue down the buttons.
 
Glues Of Choice:
Mono Multi.(repositionable)
Zig glue pen (repositionable)
Double sided tape.
3D Foam squares.
 
Ink for stamping:
Archival Black Dye ink.
 
Embossing:
Cuttle Bug and Embossing Dies
 
Chipboard Elements:
Enmarc Mini Borders
 
Cutting:
Scissors and Carl paper trimmer.
 
Paper flowers:
Tim Holtz Die
 
 
Happy Card Making!

Friday, December 21, 2012

Old book paper for a Christmas banner

Old book paper
Manila Tags
Alphabet letters
Small paper bags
Doilies
Seam binding ribbon
Pearls and charms
Small tags
Small clothes pegs
and other stuff from my stash.... 
These are all the things that I used to make these tags.
 
Glue the alphabet letters face down to some old book paper with
gel medium and let is dry. Cut away the extra paper and then sand the edges
for a smooth finish. For definition around the edges, use a little bit of Distress ink.
 
On the craft bags I used a piece of a doily, a paper heart and a charm.
I used no glitter ( I can't believe it myself )
but there is bling!
 
One bead charm per craft tag and I made eight of these.
Some of them to put on a manila tag and the other to use on their own.

Some of the tags are tied to the string with the seam binding tape
and the others are kept in place with the clothes pegs.
 
You can put anything on the tags and bags, use the stuff you have
....... and your imagination!
 
Merry Christmas to all our Blog friends,
may your Christmas be peaceful and
the new year full of good surprises!
Love you all. x


Tuesday, December 11, 2012

If you met my Family

you would understand.....
 
This is one of my favourite quotes and I just had to make myself one.
I used:
A stretched canvas, VersaMark ink pad, some clear embossing powder,
Stampers Anonymous stamps (Tim Holtz Collection),
Dala Sun Paint, coarse salt, craft paint, old alphabet
letters, a diamante star, E 6000 glue and a Tim Holtz bird cage.
 
Ink up a stamp and carefully stamp onto the canvas to create a border.
Pour over some clear embossing powder and heat set.
Choose a colour and paint the canvas.
While the paint is drying wipe off some of the paint on the embossed area
and sprinkle a little coarse salt onto the canvas.
Watch how the magic happens.
Can you see the white dots on the background?
(See the sparks flying?) Ok!
 

Paint the alphabet letters in another colour and let them dry.
Then spray them with glimmer mist.
The easiest way to position the letters was to use a repositionable glue,
like Mono Multi glue. Let the glue dry and then position the letters.
If they fall off afterwards, just glue them back on while the glue is still wet.

For fun I added a piece of lace from my grandma's stash.
(we all inherit something!) 


The small charm star was then glued inside the cage.
(but never let the star inside you be locked away)
I used some of the craft paint and my finger to paint the outside of the cage.
To keep the cage in place I also used a bit of E 6000 glue and there you go,
all done.
 
I have another canvas planned and waiting on my studio table.
and another one......
 
Will keep you posted.


Monday, December 3, 2012

Mills and Boon for Christmas!

My theme for this year is old book paper.
Here are a few of my ideas to decorate your gifts and your table.
 An old Mills and Boon paperback
works great as a source for the old book paper.
 
I used my Martha Stewart Paper Punches to create this lace border.
I had to punch three pages at a time, it just works better than one.
Then a Spellbinders Nestabilities die for the base of the flower and
a red paper rose to get the colour going.
 
Cut some pages in half and then do the punching. Join the pages at the top and bottom.
 Now you can use it as "ribbon" to wrap it around a gift.
 
For the stars and the hearts I used the Sizzix Framelits dies.
(all available from Scrap-a-Doodles)
Book wrapping paper works great as gift wrapping paper, but it can be very boring,
so you need to Zoosh it up with a piece of string and some bling.
 
Use the different size hearts. Cut 5 and fold them in half.
Glue them together and arrange them on the gift. Remember to bling it up!
 Here I used Zig glue and because you can work very accurate and it still sticks when it is dry.
 
A paper rosette with a red rose on each plate will look FABULOUS!
 

Saturday, December 1, 2012

How to - Bath and Beauty Gifts for Christmas


On Saturday, November 10th, 2012,
Elna taught at the Pretoria branch of Soul Sisters.
The ladies made their own 
Atomisers (Spritzers),
Bath Salt Tea Bags and
Body Scrubs.

Most of these products can be "concocted" from supplies which are
available at you local pharmacy or health shop.

Here are the links for the 

For the Atomiser you need to mix:
a tablespoon of Rubbing Alcohol (or Vodka) and
7 drops of your favourite essential oil
in a mister bottle before
filling up the bottle with distilled water
(We used a 50ml (2 ounces) bottle)

Another one of my favourites is a 

Sugar Body Scrub:
 Pour 160ml (5 ounces) of sugar into a jar with a wide neck;
Add 60ml (2 ounces) of Soluble Bath Oil (Mineral oil / Technical Oil),
a teaspoon of Vitamin E Oil and
10 drops of your favourite essential oil.
Stir with a wooden stick until it forms a paste
(the sugar will remain gritty).

Apply to hands/feet, rub and rinse with warm water.

********

You can also make your own 

Diffuser Oils
Mix together 60ml (2 ounces) Mineral Oil (Soluble Bath Oil / Technical Oil)
a teaspoon of rubbing alcohol (or Vodka) and
10 drops of your favourite essential oil.

These recipes are ideal for making inexpensive handmade gifts
for family, friends, teachers and all the other special people in your life!!

For great labels to use on your gifts, go to the Graphics Fairy website.
Karen has some amazing labels that you can download!!